< Reading & Writing XML 7 | Main | XSLT - Transforming XML 2 >
XSLT - Transforming XML 1
What we have in this page?
-
What will you learn
-
Using XSL to Transform XML
-
Using XPath
-
The XPathNavigator Class
-
Using XPathNavigator
----------Next-------------------
-
Using XPath with XPathNavigator
-
Basic XPath Syntax
-
Using XSL
-
The Basics of XSL Style Sheets
-
A Very Quick Reference
In this module, you will learn how to:
The XPath and XSL technologies give you a powerful way to transform XML into other forms. This module gives you an introduction to how these technologies are implemented in the Microsoft .NET Framework.
Using XSL to Transform XML
XML is proving to be a useful way of storing and exchanging data, but it isn’t very often that you want to use the data in XML format. You usually need to transform the data into some other form to present it to the end user or use it in programs. By using the classes in the XML namespaces, such as XmlTextReader and XmlDocument, you can obviously write programs that parse XML and turn it into other forms. The problem is that doing so requires programming skills, and in the Web world, a lot of people want to manipulate XML but don’t have such skills. The EXtensible Stylesheet Language (XSL) was developed to provide a way of transforming XML that doesn’t rely on programming skills. Anyone who understands XML syntax can write a style sheet, which is then applied to an XML document to transform it into some other form. If you’ve encountered cascading style sheets (CSS) when putting a Web site together in HTML, you already know how style sheets can be used to manipulate data. XSL is far more full-featured than CSS and permits a much greater range of transformations. XSL Transformations (XSLT) adds extra constructs to XSL to make it into a simple (and cumbersome) programming language, which greatly increases the scope and complexity of the transformations that you can perform. XSL and XSLT are not normally thought of as separate entities, so when we talk about XSL in the rest of this module, you can assume that we are including XSLT as well. XSL is used for several different types of text-based transformations, such as:
|
To use XSL, you create a style sheet and then pass the XML document and the style sheet through an XSL engine, which performs the transformation. An XSL engine is included with the Microsoft XML (MSXML) parser, and because this parser is installed with Microsoft Internet Explorer, you don’t need to install anything extra to start using XSL.
Before getting into specifics, we’ll mention XPath. It is very common in XSL to want to pick out particular elements or groups of elements. For instance, we might want to display all the title elements as <h1> HTML headings, or all author elements in bold. XPath (the XML Path Language) provides a syntax for selecting elements based on their names, relationships within the document, and other criteria.
If you’ve met regular expressions in text editors or programming languages, you have an idea of how XPath works: XPath is used to select elements, rather than text, from a document.
Using XPath
XPath provides a way to specify selection criteria for elements, such as “all the items that cost more than $30” or “the invoices that are more than 30 days old.” XPath expressions are normally used in XSL style sheets but can also be used within code to select elements from a Document Object Model (DOM) tree.
The XPathNavigator Class
Before you can try using XPath, let me introduce the XPathNavigator class, which is part of the System::Xml::XPath namespace. In Module 25, you encountered two ways of parsing XML. The first, XmlTextReader, provided a simple, forward-only mechanism, where you used the Read method to read the elements in sequence. The second, XmlDocument, read the entire document into memory, but you had to walk through the tree manually. One of the main differences between these two classes is that XmlTextReader always has the idea of a current node, but XmlDocument does not. XPathNavigator is a class that sits on top of an XmlDocument and navigates through the document for you. Like XmlTextReader, it has the notion of a current position, but unlike XmlTextReader, you aren’t restricted to moving forward through the document.
The following tables list the most commonly used properties and methods of the XPathNavigator class. You’ll notice that there is a certain amount of overlap with the XmlDocument class. Keep in mind that the newer version of .NET Framework will make some of the methods and properties obsolete and there will be new methods and properties as well.
| Property | Description |
| HasAttributes | Set to true if the current element has attributes. |
| HasChildren | Set to true if the current node has children. |
| IsEmptyElement | Set to true if the current element has no content. |
| Name, LocalName | The name of the current node, with or without a namespace prefix. |
| NodeType | The node type; will be one of the XmlNodeType values listed on page 409. |
| Prefix | The current namespace prefix, if any. |
| Value | The value of the current node. |
| XmlLang | The value of the xml:lang attribute. |
|
Table 1 | |
| Method | Description |
| Clone | Creates a new XPathNavigator positioned at the same point. |
| ComparePosition | Compares the position of this navigator to that of another navigator. |
| Compile | Compiles an XPath expression into an XpathExpression object. |
| Evaluate | Evaluates an XPath expression. |
| GetAttribute | Gets the value of a named attribute. |
| GetNamespace | Gets the value of a namespace node corresponding to a local name. |
| IsDescendant | Returns true if an XPathNavigator is a descendant of the current navigator. One navigator is a descendant of another if it is positioned on a descendant node. |
| IsSamePosition | Returns true if two navigators are positioned on the same node. |
| Matches | Returns true if the current node matches an XPath expression. |
| MoveTo | Moves the navigator to the same position as another navigator. Returns false if the move fails. |
| MoveToAttribute | Positions the navigator on a given attribute. Returns false if the attribute cannot be found. |
| MoveToFirst, MoveToNext, MoveToPrevious | Moves between nodes at the same level in the tree (sibling nodes). Returns false if there is not a valid node to move to. |
| MoveToFirstAttribute, MoveToNextAttribute | Moves to the first and subsequent attributes of an element. Returns false if there is not an attribute to move to. |
| MoveToFirstChild | Moves to the first child element. Returns false if there are no children. |
| MoveToId | Moves to a node with the specified ID attribute. Returns false if a node with the given ID cannot be found. |
| MoveToNamespace, MoveToNextNamespace | Moves to namespace nodes. Returns false if the namespace cannot be found or if the navigator is not positioned on an element node. |
| MoveToParent | Moves up one level in the tree. Returns false if the current node does not have a parent. |
| MoveToRoot | Moves to the root of the tree. |
| Select | Selects zero or more nodes based on an XPath expression. |
| SelectAncestors | Selects ancestors of the current node based on selection criteria. |
| SelectChildren | Selects children of the current node based on selection criteria. |
| SelectDescendants | Selects descendants of the current node based on selection |
|
Table 2 | |
Using XPathNavigator
This exercise will show you how to create an XPathNavigator and use it to move around a document. It uses the same myxml.xml and mydtd.dtd files used in the exercises in Module 25.
1. Create a new Visual C++ CLR Console Application project named CppNavigator.
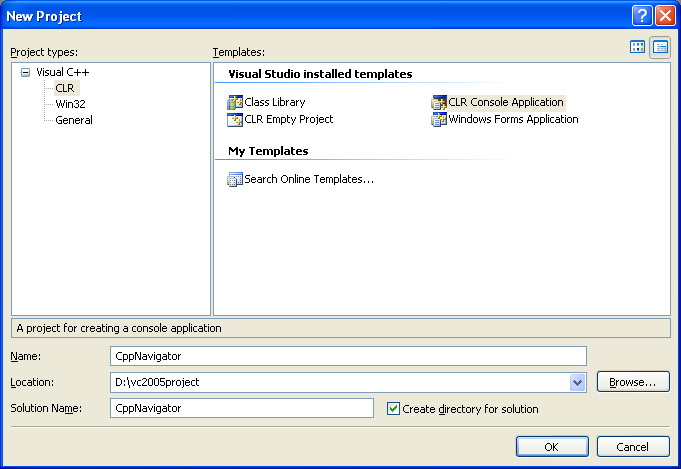
2. Add the following three lines to the top of CppNavigator.cpp:
#using <System.xml.dll>
...
...
using namespace System::Xml;
using namespace System::Xml::XPath;

The code for the XML classes lives in System.xml.dll, so it needs to be included by means of a #using directive. It’s also going to be easier to use the classes if you include using directives for the System::Xml and System::Xml::XPath namespaces, as shown in the preceding code.
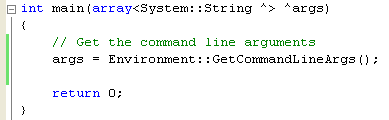
3. You’re going to supply the name of the XML document when you run the program from the command line, so change the declaration of the main() function to include the command-line argument parameters, like this:
// Get the command line arguments
args = Environment::GetCommandLineArgs();
4. Add this code to the start of the main() function to check the number of arguments and save the path:
// Check for required arguments
if (args->Length < 2)
{
Console::WriteLine(L"Usage: {0} path", args[0]);
return -1;
}
String^ path = gcnew String(args[1]);

5. Now that you’ve got the path, create an XmlDocument to parse the file and load it into a DOM tree.
try
{
// Create the XmlDocument to parse the file
XmlDocument^ doc = gcnew XmlDocument();
// Load the file
doc->Load(path);
Console::WriteLine(L"Document loaded");
}
catch(Exception^ pe)
{
Console::WriteLine(pe->Message);
}
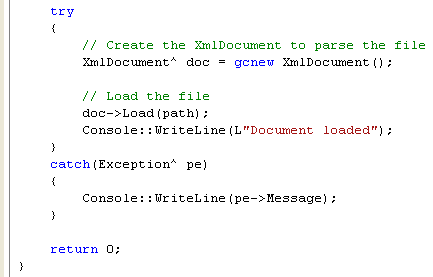
As explained in the XmlDocument example in Module 25, it’s a good idea to be prepared to catch exceptions when using XmlDocument because it will throw exceptions if it has problems opening the file and if it finds any parsing errors.
6. Create an XPathNavigator that uses the XmlDocument. Add the following code and any code presented further in this exercise to the end of the code inside the try block:
// Create the navigator
XPathNavigator^ nav = doc->CreateNavigator();
 |
The navigator will let you navigate over the tree created by the XmlDocument. It’s also possible to create XPathNavigator objects to work with fragments of XML documents by using an alternative constructor that takes a pointer to a node somewhere in the document.
7. Add the following code that shows how you use the navigator to walk through the document:
// Move to the top of the tree and print details
nav->MoveToRoot();
Console::WriteLine(L"top: name={0}, \ntype={1}, \nvalue={2} \n",
nav->Name, ((Object^)(nav->NodeType))->ToString(), nav->Value);
Console::WriteLine();
// Move to the first child, which is a comment
nav->MoveToFirstChild();
Console::WriteLine(L"first child: name={0}, type={1}",
nav->Name, ((Object^)(nav->NodeType))->ToString());
// Move to the next element, which is the root element
nav->MoveToNext();
Console::WriteLine(L"next child: name={0}, type={1}",
nav->Name, ((Object^)(nav->NodeType))->ToString());
// Move to the next element, which will be the first
// volcano
nav->MoveToFirstChild();
Console::WriteLine(L"next child: name={0}, type={1}",
nav->Name, ((Object^)(nav->NodeType))->ToString());
if (nav->HasAttributes)
{
nav->MoveToFirstAttribute();
Console::WriteLine(L" attribute: name={0}, type={1}", nav->Name, nav->Value);
nav->MoveToParent();
}
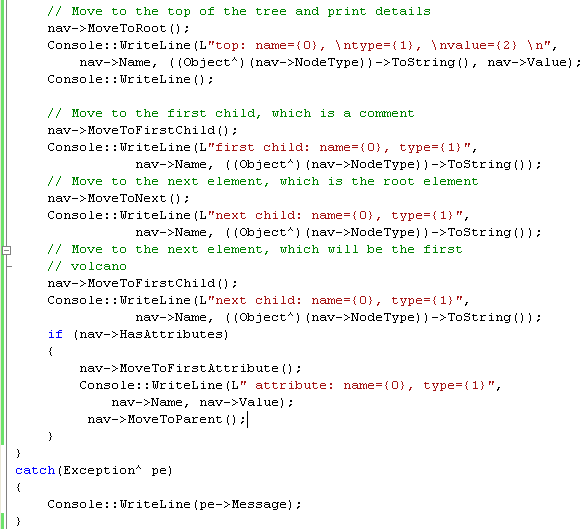
The navigator isn’t positioned on any node initially, so you need to call MoveToRoot to move it to the top of the tree. As with XmlDocument, this isn’t the root element of the XML but rather the top of the DOM tree. Move around the tree by calling the various Move methods. You need to be careful to distinguish between sibling and child nodes. MoveToNext and MoveToPrevious will move between sibling nodes at the same level in the tree, whereas MoveToFirstChild, MoveToNextChild, and the other Child functions move down a level to work with child nodes. You can use MoveToParent to move back up a level when you’ve finished processing child nodes.
In this example, MoveToRoot positions the XPathNavigator object at the root of the DOM tree. If you look at the output from this code, you’ll see that the root doesn’t have a name. Its type is Root, and its value is a long string of text, which represents the concatenated values of all its child nodes. This isn’t very useful, but it is logical because the value of an element consists of its value plus the value of all its children.
This code uses the Name, NodeType, and Value properties. Whether the node has a Name and a Value will depend on the NodeType. You’re navigating down to the first volcano element, and because it has a name attribute, the code prints out the details of the first attribute. Note the call to MoveToParent after the attribute details have been printed. Attributes are children of their parent node, so when you’ve finished processing the attributes, you have to move one level up to point the navigator back at the parent element.
8. Make sure the myxml.xml and mydtd.dtd files are under the project’s debug directory (else you nee to provide a full path to those files). The following are our myxml.xml and mydtd.dtd files used in the previous module.
<?xml version="1.0" encoding="utf-8" ?>
<!-- Volcano data -->
<geology>
<volcano name="Erebus">
<location>Ross Island, Antarctica</location>
<height value="3794" unit="m"/>
<type>stratovolcano</type>
<eruption>constant activity</eruption>
<magma>basanite to trachyte</magma>
</volcano>
<volcano name="Hekla">
<location>Iceland</location>
<height value="1491" unit="m"/>
<type>stratovolcano</type>
<eruption>1970</eruption>
<eruption>1980</eruption>
<eruption>1991</eruption>
<magma>calcalkaline</magma>
<comment>The type is actually intermediate between crater row
and stratovolcano types</comment>
</volcano>
<volcano name="Mauna Loa">
<location>Hawaii</location>
<height value="13677" unit="ft"/>
<type>shield</type>
<eruption>1984</eruption>
<magma>basaltic</magma>
</volcano>
</geology>
<?xml version="1.0" encoding="utf-8" ?>
<!ELEMENT geology (volcano)+>
<!ELEMENT volcano (location,height,type,eruption+,magma,comment?)>
<!ATTLIST volcano name CDATA #IMPLIED>
<!ELEMENT location (#PCDATA)>
<!ELEMENT height EMPTY>
<!ATTLIST height value CDATA #IMPLIED unit CDATA #IMPLIED>
<!ELEMENT type (#PCDATA)>
<!ELEMENT eruption (#PCDATA)>
<!ELEMENT magma (#PCDATA)>
<!ELEMENT comment (#PCDATA)>
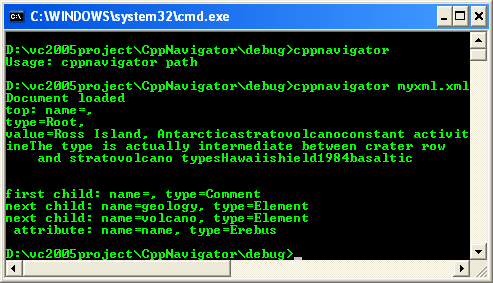
9. Build and run your application. The following figure shows a sample program output for our exercise.
10. Experiment with adding more code to the program to print out selected elements and attributes, and make sure that you’re getting the results you expect.
Part 1 | Part 2