< C++ .NET WinForm, Dialog Box & Controls 4 | Main | C++ .NET WinForm, Dialog Box & Controls 6 >
Windows Form, Dialog Boxes and More Controls 5
Using the ListView Control
A list view is a control that is used to display a list of items; unlike the tree view, there’s no hierarchical structure in the data being displayed. An item in a list view can have several items of text and icons associated with it and can be displayed in one of the following four views:
You can see what these views look like by opening Windows Explorer and using the View menu to change the appearance of the list view. Like TreeView, ListView is a complex class with many properties, methods, and events. The following tables summarize the most important ones. |
| Property | Description |
| Alignment | Represents how items align in the list view. The default is to align to the top of the control. |
| AllowColumnReorder | Determines whether the user can drag column headers to reorder the columns. This property is meaningful only in Details view. The default is false. |
| AutoArrange | Determines whether items are automatically arranged according to the alignment. The default is true. |
| BackColor | Represents the background color of the control. |
| BorderStyle | Represents the border style of the control. The default is Fixed3D. |
| CheckBoxes | Determines whether each item will have a check box next to it. The default is false. |
| CheckedIndices | Gets the indexes of the currently checked list items. |
| CheckedItems | Gets the currently checked list items. |
| Columns | The collection of columns used in Details view. |
| FocusedItem | Gets the item that currently has the focus. |
| ForeColor | Represents the foreground color of the control. |
| FullRowSelect | Determines whether clicking an item will select just the item or the entire row it’s in. This property is used only in Details view. The default is false. |
| GridLines | Determines whether gridlines are drawn between items. The default is false. |
| HeaderStyle | Gets or sets the column header style: clickable, non- clickable, or no header. |
| HideSelection | Determines whether the highlighting of selected items is hidden when the control loses the focus. The default is true. |
| HoverSelection | Determines whether items can be selected by hovering over them with the mouse. The default is false. |
| Items | The collection of items belonging to the ListView. |
| LabelEdit | Determines whether the user can edit item labels. The default is false. |
| LabelWrap | Determines whether item labels wrap in icon view. The default is true. |
| LargeImageList | The ImageList used in Large Icon view. |
| MultiSelect | Determines whether the ListView allows selection of more than one item at a time. The default is true. |
| Scrollable | Determines whether scroll bars are visible. The default is true. |
| SelectedIndices | A collection holding the indexes of currently selected items. |
| SelectedItems | A collection holding pointers to the currently selected items. |
| SmallImageList | The ImageList used in Small Icon view. |
| Sorting | Represents the sort order of the items: ascending, descending, or none. |
| StateImageList | The ImageList used for application-defined states. |
| TopItem | Returns the item at the top of the list. |
| View | Represents the view that the ListView is currently displaying: Large Icon, Small Icon, List, or Details. |
|
Table 6 | |
| Method | Description |
| ArrangeIcons | Arranges icons in Small Icon or Large Icon view. |
| BeginUpdate | Disables redrawing of the ListView. Use this method if you’re going to add several items because it prevents the control from redrawing itself after each item is added. |
| Clear | Removes all items and columns from the ListView. |
| EndUpdate | Re-enables redrawing of the ListView. |
| EnsureVisible | Ensures that a particular item is visible, scrolling the list if necessary. |
| GetItemAt | Gets the item at specific X, Y coordinates. |
| GetItemRect | Gets the bounding rectangle for an item. |
| IsInputKey | A protected method that handles special input keys, such as Page Down and the arrow keys. |
|
Table 7 | |
| Event | Description |
| AfterLabelEdit | Occurs after a label is edited. |
| BeforeLabelEdit | Occurs before a label is edited. |
| ColumnClick | Occurs when the user clicks a column. |
| ItemActivate | Occurs when an item is activated. |
| ItemCheck | Occurs when the user checks an item; applies only if the CheckBoxes property is set to true. |
| ItemDrag | Occurs when an item is dragged and dropped. |
| SelectedIndexChanged | Occurs when the user clicks an item. |
|
Table 8 | |
The items displayed in a list view are represented by the ListViewItem class. A ListViewItem can contain a number of data items:
-
A label.
-
An image index, which determines which image from the large and small ImageLists will be used for this item.
-
Foreground and background colors.
-
A tag, which can be any .NET object that you want to attach to the item.
-
A collection of subitems, which are used to provide the data for the columns when the control is in Details view.
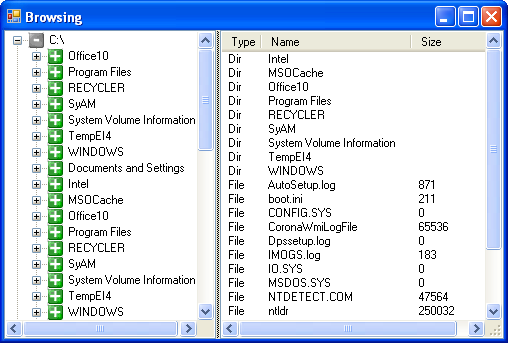
To show you how to use a ListView, the following exercise continues working with the CppControls project and adds a list view control to the right side of the main form. The details of any directory you select in the tree view control will display.
21. Continue using the CppControls project you created earlier. Drag a ListView from the Toolbox onto the form’s panel2 container.
22. Set its Dock property to Fill by selecting the property in the editor and picking the center bar from the graphical chooser that pops up. This property will cause the list view to fill the unused area of the form’s panel2.

23. As a test, create a couple of ListViewItem objects and add them to the ListView. Select the ListView and select the Items property in the Properties editor. Click the ellipses (...) button to the right of the property to bring up the ListViewItem Collection Editor. Press Add to add a new item, and set its Text property to Foo. Add a second item, and set its Text to Bar.
|
24. Build and run the application. You should see the ListView and items displayed as shown in the following figure.
|

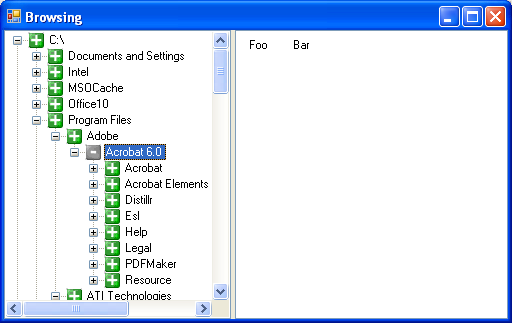
The items are being displayed in the default Large Icon view, but because there are no icons, you see only the labels.
Displaying Directory Details
Now that you’ve seen how to create a ListView, let’s use it to display the details of the directory that’s currently selected in the TreeView. For simplicity, this example will support only the Details view, but you could add code to support the other three views.
25. Continue using the CppControls project you created earlier. Bring up the ListViewItem Collection Editor, and delete the two sample items. Now that you know the application works, you no longer need the samples.
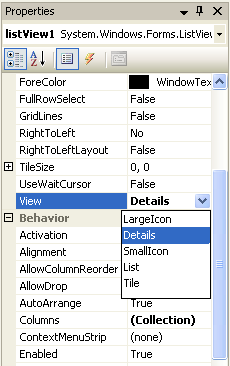
26. Set the View property to Details to switch the control to Details view.
27. To use Details view, you need to set up columns to display the data. This information is held in the Columns collection of the ListView, which holds ColumnHeader objects. You can bring up a ColumnHeader Collection Editor in the usual way, by selecting the Columns property and clicking the ellipses (...) button.
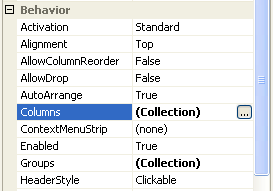

28. Add three headers to the collection, with the Text Type, Name, and Size, and Widths of 40, 85, and 65 pixels, respectively. Dismiss the ColumnHeader Collection Editor by clicking the OK button.

Each ColumnHeader has a label set through the Text property and a Width in pixels. In this example, we display only the type of the item (file or directory), its name, and its size. You can add more columns if you want to display more information. When you close the editor, you’ll see the columns displayed in the designer view.

29. That’s all the setting up. You can run the program now, and you’ll see an empty ListView on the form.

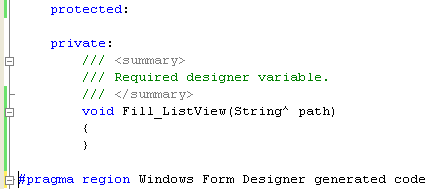
30. The next step is to add the code to fill the ListView with file and directory information. Add a private member function named Fill_ListView to the Form1 class, like this:
void Fill_ListView(String^ path)
{
}
The argument is the directory path whose contents we want to display.
31. Add a call to Fill_ListView to the end of the BeforeExpand handler function, treeView1_BeforeExpand, as shown here:
// Fill the ListView with details of the current node
Fill_ListView(e->Node->FullPath);
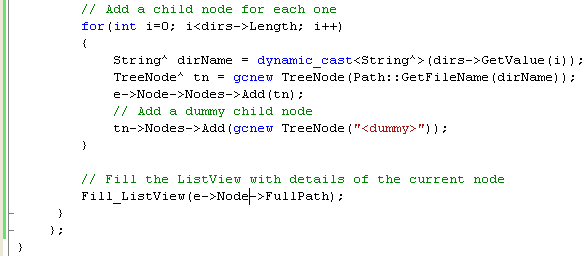
When the child nodes have been constructed and added to the TreeView, the full directory path is passed to Fill_ListView so that it can fill in the ListView.
32. Now let’s start coding Fill_ListView. The first task is to clear out the existing items to make way for the new directory listing.
void Fill_ListView(String^ path)
{
// Clear everything from the ListView
listView1->Items->Clear();
}
Make sure that you call Clear on the Items property, and don’t call listView1->Clear instead because that will clear everything from the ListView, including the column headers you just added!
33. In true Windows Explorer style, the ListView will list the directories first, followed by the files. Add this code to get the subdirectories of the current path:
void Fill_ListView(String^ path)
{
// Clear everything from the ListView
listView1->Items->Clear();
// Start with the directories
array<String^>^ dirs;
try
{
dirs = Directory::GetDirectories(path);
}
catch(System::Exception^ pe)
{
MessageBox::Show(pe->Message, "Some Error");
return;
}
}

This code uses the same Directory::GetDirectories function that you used when creating TreeView entries. Once again, the call is enclosed in a try and catch block, although in this case, there’s much less chance that an exception will be thrown.
34. Once you’ve got the list of directory names, create ListViewItems to represent them and add them to the ListView, add the following code at the end of the previous code:
// Create new ListViewItem objects to represent the directories
for(int i=1; i<dirs->Length; i++)
{
String^ pathName = dynamic_cast<String^>(dirs->GetValue(i));
String^ dirName = Path::GetFileName(pathName);
// Create an array of String* to hold the subitems
array<String^>^ subItems = gcnew array<String^>(3);
subItems[0] = L"Dir";
subItems[1] = dirName;
subItems[2] = L" ";
// Create the ListViewItems from the subitems
ListViewItem^ itm = gcnew ListViewItem(subItems);
// Add the ListViewItem to the ListView
listView1->Items->Add(itm);
}
The GetValue function retrieves an item from the array, and GetFileName splits off the final component from the path. We need a ListViewItem that has three text fields, one for each of the three columns in the ListView. There’s a constructor for ListViewItem that takes an array of Strings, so it’s a simple matter to create an array of three Strings, initializing them to the type of item (Dir for directory), the name of the directory, and a blank string for the size because we don’t report sizes for directories. If you want to get more sophisticated, investigate creating ListViewSubItems and using them to build a ListViewItem. ListViewSubItem lets you assign icons, fonts, and colors to each individual item. The last few lines create a ListViewItem from the String array and then add the ListViewItem to the ListView.
35. Follow the same process to add details of the files. Here’s the code, add at the end of the previous code. It’s long, but there’s little here you haven’t seen before.
// Create new ListViewItem objects to represent the files Next, the files
array<String^>^ files = Directory::GetFiles(path);
for(int i=1; i < files->Length; i++)
{
String^ pathName = dynamic_cast<String^>(files->GetValue(i));
String^ dirName = Path::GetFileName(pathName);
// Create an array of String^ to hold the subitems
array<String^>^ subItems = gcnew array<String^>(3);
subItems[0]= L"File";
subItems[1] = dirName;
// Find the file size
FileInfo^ f = gcnew FileInfo(pathName);
subItems[2] = (f->Length).ToString();
// Create the ListViewItems from the subitems
ListViewItem^ itm = gcnew ListViewItem(subItems);
// Add the ListViewItem to the ListView
listView1->Items->Add(itm);
}
The code is almost exactly the same as the code for adding directory details, except for the lines that find the file size. The System::IO::FileInfo class represents a file path, and it’s used to get the length of the file in bytes. The long value returned by the property is boxed so that you can call ToString on it, and the resulting String is added to the list of subitems. If you miss something for this part of coding, a complete code for Fill_ListView() is given below.
void Fill_ListView(String^ path)
{
// Clear everything from the ListView
listView1->Items->Clear();
// Start with the directories
array<String^>^ dirs;
try
{
dirs = Directory::GetDirectories(path);
}
catch(System::Exception^ pe)
{
MessageBox::Show(pe->Message, "Some Error");
return;
}
// Create new ListViewItem objects to represent the directories
for(int i=1; i<dirs->Length; i++)
{
String^ pathName = dynamic_cast<String^>(dirs->GetValue(i));
String^ dirName = Path::GetFileName(pathName);
// Create an array of String* to hold the subitems
array<String^>^ subItems = gcnew array<String^>(3);
subItems[0] = L"Dir";
subItems[1] = dirName;
subItems[2] = L" ";
// Create the ListViewItems from the subitems
ListViewItem^ itm = gcnew ListViewItem(subItems);
// Add the ListViewItem to the ListView
listView1->Items->Add(itm);
}
// Create new ListViewItem objects to represent the files Next, the files
array<String^>^ files = Directory::GetFiles(path);
for(int i=1; i < files->Length; i++)
{
String^ pathName = dynamic_cast<String^>(files->GetValue(i));
String^ dirName = Path::GetFileName(pathName);
// Create an array of String^ to hold the subitems
array<String^>^ subItems = gcnew array<String^>(3);
subItems[0]= L"File";
subItems[1] = dirName;
// Find the file size
FileInfo^ f = gcnew FileInfo(pathName);
subItems[2] = (f->Length).ToString();
// Create the ListViewItems from the subitems
ListViewItem^ itm = gcnew ListViewItem(subItems);
// Add the ListViewItem to the ListView
listView1->Items->Add(itm);
}
}
36. If you build and run the application, you should be able to list directory contents.

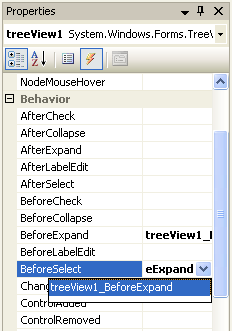
37. The ListView gets updated only when you expand a tree node, but it would be good if it were updated whenever you select a node. Do so by adding a handler for the BeforeSelect event of the treeView1, but this time, do not simply double-click in the blank space next to the event name instead use the drop-down button to list the event handlers for the TreeView, and select the BeforeExpand handler; both events will trigger the same handler function. Linking both events to the same handler is what we want here because we want both events to take the same action. You’ll now find that the ListView gets updated whenever you select or expand a node.
Part 1 | Part 2 | Part 3 | Part 4 | Part 5 | Part 6 | Part 7