< C++ .NET WinForm 6 | Main | C++ .NET WinForm, Dialog Box & Controls 2 >
Windows Form, Dialog Boxes and More Controls 1
Module 21 introduced you to the world of Windows Forms and showed you how you can use the classes in the System::Windows::Forms namespace to build GUI applications. This module will looks at more features of Windows Forms. It starts by showing you how to create and use dialog boxes in GUI applications and then goes on to look at more of the controls provided by the System::Windows::Forms namespace. The exercises will try to build the Windows Explorer GUI with various controls positioned onto Windows Form. |
|
Using Dialog Boxes
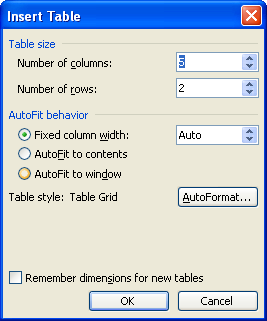
You’ve met dialog boxes before, the About dialog box possessed by just about every application, for example, or the Insert Table dialog box in Microsoft Word shown below.

In the .NET Framework, the difference between dialog boxes and other kinds of windows is rather blurred, and a dialog box is just another form. However, that hasn’t always been the case in Microsoft Windows programming. Before .NET, dialog boxes had several special properties:
-
They were windows that were optimized to work with controls.
-
They usually had a fixed border so that you couldn’t resize them.
-
They could be described in data using a dialog box template, and they could be automatically created and populated with controls at run time. This data was attached to the executable as a binary Windows resource.
-
They could be created as modal dialog boxes, in which case the application was blocked until the dialog box was sent away, or as modeless dialog boxes, in which case the dialog box window floated on top of its parent window and you could use both.
Windows Forms has some of these properties already. You can easily use controls on forms, and you can set the border so that the form can’t be resized. However, you can’t use dialog box templates because .NET doesn’t use resources. You have to build dialog boxes in code, just like any other form. To help you design forms that work like modal dialog boxes, the Form class has a ShowDialog function that displays a form modally, so you have to close the form before you can use the rest of the application. The following exercise continues the CppForm project that you began in Module 21 and shows you how to create an About dialog box for your application. If you haven’t worked through the examples in Module 21, you’ll find the code for the CppForm project with the sample files. You can use this code as the basis for the first exercises in this module.
Dialog Box Design
As with menus, you should be aware of a couple of design guidelines when designing dialog boxes. If the dialog box simply exists to display some data, such as a reminder, to the user, it should include a button that the user can use to dismiss the dialog box. This button should be labeled with OK, Done, or another word indicating that the user is finished with the dialog box. If the user enters data into the dialog box, it should include two buttons. One button will accept the changes and dismiss the dialog box and is conventionally labeled OK, while the other button will discard the changes before dismissing the dialog box and is normally labeled Cancel. These buttons are usually placed in a horizontal row at the bottom of the dialog box. On a more general note, don’t make dialog boxes too cluttered. It’s better to have several dialog boxes that do one thing well than one giant dialog box that is a mess of controls. You might also want to consider investigating tabbed dialog boxes, which can help to reduce clutter.
1. Open the CppForm project if it isn’t already open.
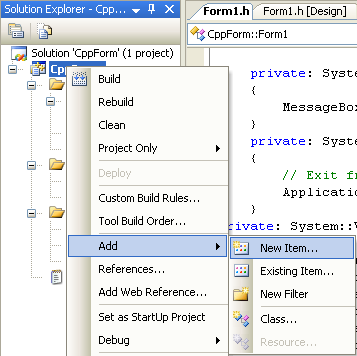
2. Right-click the project name CppForm in Solution Explorer, and choose Add and then Add New Item from the context menu. Make sure that the UI (User Interface) is selected in the Categories and (Windows Form (.NET) icon if in Visual Studio 2005) Windows Form is highlighted in the Templates pane, and enter the name AboutBox for the new form.

A dialog box is simply another form, and the main difference from the application’s main form lies in how you display it, as you’ll see shortly.
3. When the designer window for the dialog box appears, set the properties for the dialog box so that the caption (Text) is About CppForm, the FormBorderStyle is Fixed3D, and the Size is 300,150. The style is set to Fixed3D because dialog boxes usually are not resizable.

4. The dialog box is going to show two labels and an OK button. Drag a Label onto the form, set the Location to 20, 30 and giving it the Text The CppForm Application. Alter the Size of the label so that all the text appears on one line.
5. Drag a second label onto the form, positioning it below the first and giving it the Text Mikerisan Cronos, 2007.
6. Add a button to the form, giving it the Name OKButton and the Text OK, and setting its Size to 40, 25. Position it toward the lower right corner of the form.
7. Add an event handler for the button. Bring up the properties for the button, and make the editor display events by pressing the Event button at the top of the editor. Locate the Click event, and double-click in the blank space to the right of the word Click. Complete the handler function as shown below:
private: System::Void OKButton_Click(System::Object^ sender, System::EventArgs^ e)
{
// Close the form
Close();
}
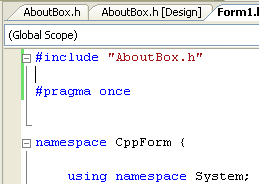
8. The handler function simply closes the form when the button is clicked. The last step is to arrange for the dialog box to be displayed when the About menu item is selected. Because we need to access the AboutBox class from the main form, open the code for Form1.h, and insert #include "AboutBox.h" at the top of the file.
9. Locate the CppForm::MenuItem_Clicked function, and edit the code as follows:
private: System::Void aboutMenuItem_Click(System::Object^ sender, System::EventArgs^ e)
{
AboutBox^ box = gcnew AboutBox();
box->ShowDialog();
}

When the About menu item is chosen, create an AboutBox object and then call its ShowDialog function, which has the effect of displaying the form as a modal dialog box so that it has to be closed before you can continue working with the application.
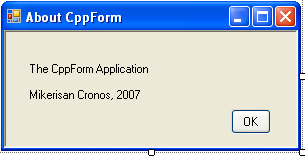
10. Build and run the application. When you select the About item on the File menu, you should see the About dialog box displayed.
 |
Part 1 | Part 2 | Part 3 | Part 4 | Part 5 | Part 6 | Part 7